
Thursday, June 4, 2009

Lesson learnt
You can definately never have too much time.
I would have liked to have done a fourth 1:1 and hopefully get closer or up to the standard that i had wished to present ( because none of my models are anywhere near this).......oh well, thats life.
Atleast i can see the improvement within my models and learn from the mistakes i repeatedly made.
*from a chair that didnt hold itself together to a sturdy tabbing system.
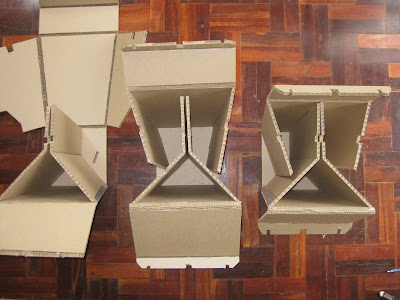
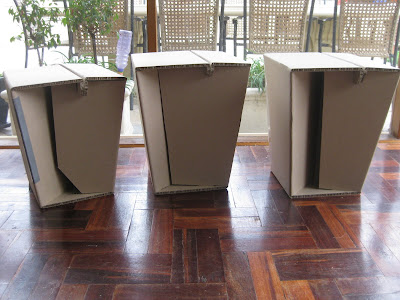
I would have liked to have done a fourth 1:1 and hopefully get closer or up to the standard that i had wished to present ( because none of my models are anywhere near this).......oh well, thats life.
Atleast i can see the improvement within my models and learn from the mistakes i repeatedly made.
*from a chair that didnt hold itself together to a sturdy tabbing system.


Branding
From looking at one of the short sides on one of the chairs, i developed the interest to brand it. Because of being able to see the supporting sections within the chair, i thought it would be interesting to flow the design inwards to guide peoples eye to the interior of the design.

Wednesday, June 3, 2009
A NEVER ENDING STORY...FAIL!!
MY FINAL 1:1.....................FAILURE!!
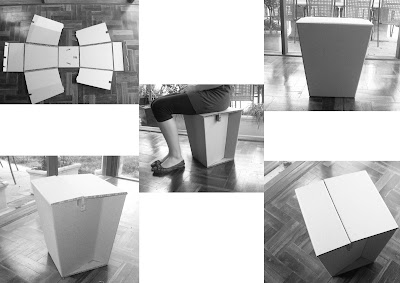
After many tears...(seriously) ....i created an even worse model than the last!!!! Unfortunately i experiemented on the last to help myself with the next, thus leaving them both in less than perfect shape.
On the positive side, things that i didnt perfect on the first, i did on the second.
its a pitty they ARENT ALL IN THE SAME MODEL :(
FAILS:
- side panels did not meet the other side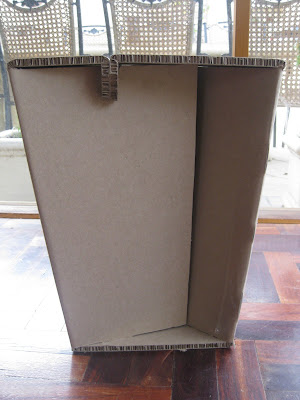
- cut through material MANY times, thus relying on contact to hold them together...MESSY!!!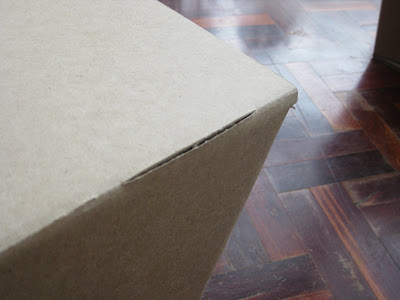
SUCCESS:
- tab system within the interior of model
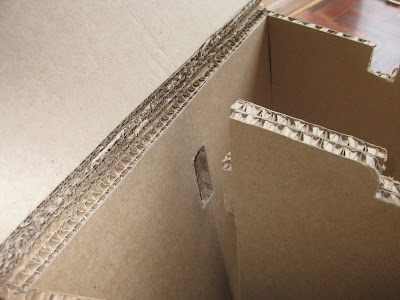
- not throwing chair out the window....although very close
After many tears...(seriously) ....i created an even worse model than the last!!!! Unfortunately i experiemented on the last to help myself with the next, thus leaving them both in less than perfect shape.
On the positive side, things that i didnt perfect on the first, i did on the second.
its a pitty they ARENT ALL IN THE SAME MODEL :(
FAILS:
- side panels did not meet the other side

- cut through material MANY times, thus relying on contact to hold them together...MESSY!!!

SUCCESS:
- tab system within the interior of model

- not throwing chair out the window....although very close
Second 1:1
What was supposed to be my final model....
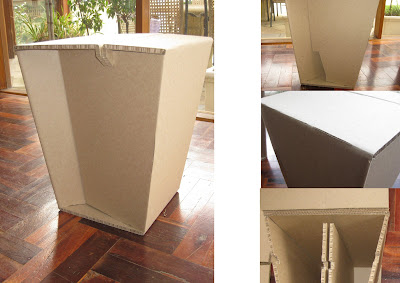 This model worked well overall but still wasnt executed as well is i hoped. I accidently cut off some tabs within the interior of the model causing it to fall apart as soon as i opened it and left plains inside to flop around. I also found myself cutting through alot of the cardboard on the sharp corners as i was cutting out so much material.
try again....
 This model worked well overall but still wasnt executed as well is i hoped. I accidently cut off some tabs within the interior of the model causing it to fall apart as soon as i opened it and left plains inside to flop around. I also found myself cutting through alot of the cardboard on the sharp corners as i was cutting out so much material.
try again....
Branding
Keeping in reference to the location of the design exhibition, I looked back at japanese art I had already explored earlier in the semester and started to sketch down some ideas. I didnt want to necessarily represens the art in a literal sense or recreate something japenese but apply their use of pattern and organic flow in my branding.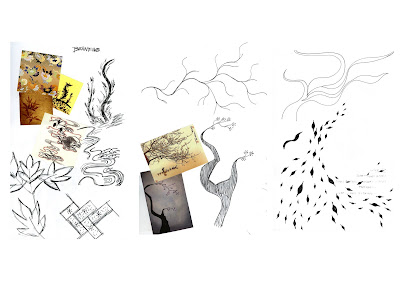

Details
Here are some sketches relating to small changes in my design. these were to ensure my chair differs from simply a box. I wanted to incorperate a few more angles to tie in with the taper of the overall design.
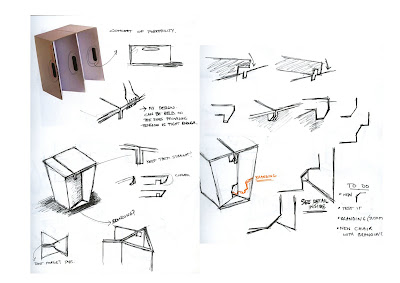 I trial a few on my previous 1:1 model and other quick models. I really liked the detail on the top locking system but was still unsure about what to do in term of the side panel of the chair.
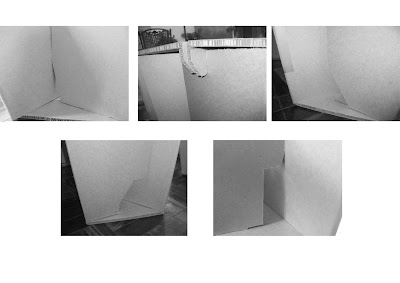
 I trial a few on my previous 1:1 model and other quick models. I really liked the detail on the top locking system but was still unsure about what to do in term of the side panel of the chair.
Monday, May 25, 2009
Final model
Things to remember when constructing my final model:
- start cuts at a minimum and work my way out
- remember to clearly analyse which angle is preventing perfect assembly before cutting anything
- consider where tapers will effect other angles.
- always snap blades off to prevent cutting too deep into cardboard.
and...
only cut the cardboard and not your finger!
- start cuts at a minimum and work my way out
- remember to clearly analyse which angle is preventing perfect assembly before cutting anything
- consider where tapers will effect other angles.
- always snap blades off to prevent cutting too deep into cardboard.
and...
only cut the cardboard and not your finger!
Xanita 1:1 mock up
Here are some images of my Xanita mock up. This was alot more tedious than expected, but i learnt several lessons for my final 1:1.
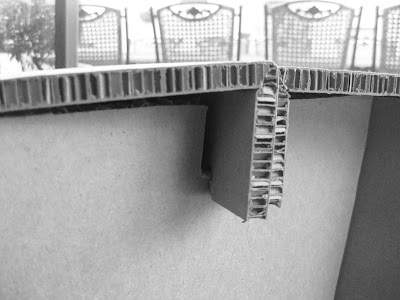
With the final plains folding on top of the whole chair and slotting in to hold the whole thing together, it is important they are the right length....obviously didn't happen here as they are not lying flat upon the supporting cardboard. Half a centimetre of each side would have cured this problem.
 While cutting the chair I came to conclusions about which angles were preventing it from sitting accurately and sometimes drew the wrong conclusions, this would be an example: I thought the angle on the bottom of this plain was not large enough when in fact it was one relating to the taper of my chair. As a result, there is a gap...noooooo
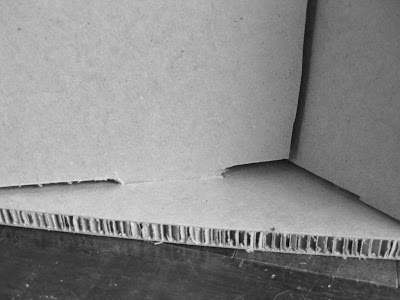 Below is a perfect example of something that was disregarded all together. As the other side of this plain is tapered, this end also tapers..derrr. The end of this flap also needs to be cut on an angle as it meets an angled surface.
Also note the gaffa tape down the side..wooops, cut too deep.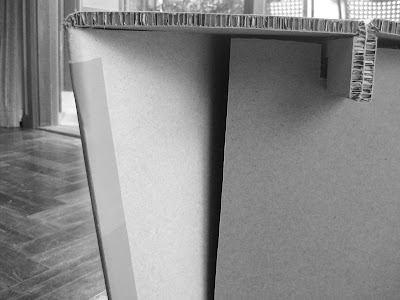

With the final plains folding on top of the whole chair and slotting in to hold the whole thing together, it is important they are the right length....obviously didn't happen here as they are not lying flat upon the supporting cardboard. Half a centimetre of each side would have cured this problem.
 While cutting the chair I came to conclusions about which angles were preventing it from sitting accurately and sometimes drew the wrong conclusions, this would be an example: I thought the angle on the bottom of this plain was not large enough when in fact it was one relating to the taper of my chair. As a result, there is a gap...noooooo
 Below is a perfect example of something that was disregarded all together. As the other side of this plain is tapered, this end also tapers..derrr. The end of this flap also needs to be cut on an angle as it meets an angled surface.
 Also note the gaffa tape down the side..wooops, cut too deep.

Monday, May 18, 2009
Flat pack
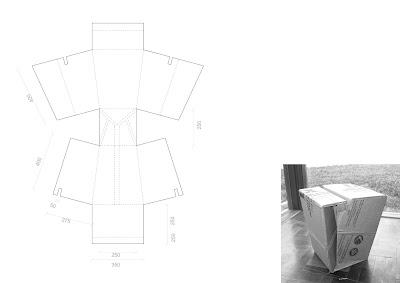
 Here is my final flat pack before constructing the chair out of xanita....let's hope it works!
Measurements and the lengths of card required will obviously always change with each attempt as each fold will require a certain amount of extra length. Because of this, it is vital to not over cut any lengths and to start small and work my way up.
Angle testing
Here are some tests i did with papaer, card and xanita to allow me to become familiar with the material, angles, cutting and tension.
Findings:
- alot more material needs to be cut out than i originally thought for allowing angles to work.
- tabbed locking system very strong

Findings:
- alot more material needs to be cut out than i originally thought for allowing angles to work.
- tabbed locking system very strong

Solidworks
This solidworks drawing was done to work out other lengths in relation to the angle. After concstructing out of card however, it came to my attention that I forgot to take the taper into consideration; therefore requiring the 7.13 angle on the flat plan to actually be doubled....oopsy


Finding correct angles
This was a quick working out of the angle in which my chair would taper from viewing it side on.
This suggested that my angle would be 7.13 degrees.
This suggested that my angle would be 7.13 degrees.

Tuesday, May 5, 2009
Final Design | 1:1 mock up
This was my first attempt of a 1:1 mock up using three layers of traditional corrigated cardboard.
This design has proven strong enough to hold the required weight but lacks in a neat execution. For further development i need to focus on obtaining the correct angles for the chair to work aesthetically aswell as functionally.
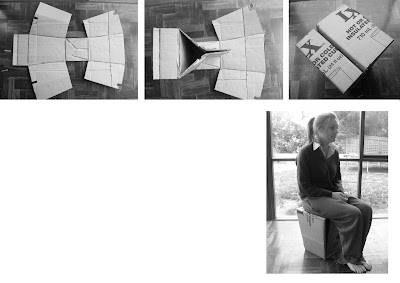
This design has proven strong enough to hold the required weight but lacks in a neat execution. For further development i need to focus on obtaining the correct angles for the chair to work aesthetically aswell as functionally.


Sketches - Developing final design
Through these sketches I explored the idea of a tapered triangle stool. I was then adding angles within that form but struggled to find a way for it to be sturdy/intelock.
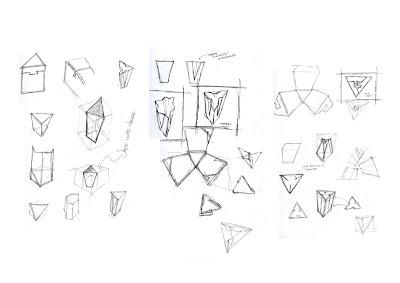 This lead to me to simplify it down to a tapered cube. With elements from last years examples that I liked, I formed a first draft of my final design.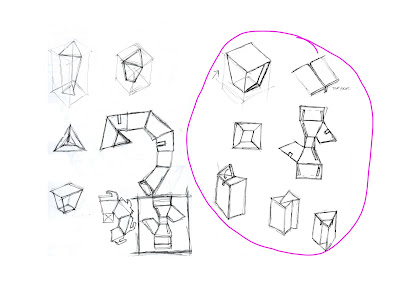
 This lead to me to simplify it down to a tapered cube. With elements from last years examples that I liked, I formed a first draft of my final design.
Tuesday, April 28, 2009
3 concepts - models
Here are some images from models i made of concepts 1 and 3. Both resulted in very study outcome. 

3 concepts - developed
Concept 3:
This design differs from the first too as it does not have the ability to lock into itself. It however takes on much more of an aesthetic role with its many folds and successful locking system.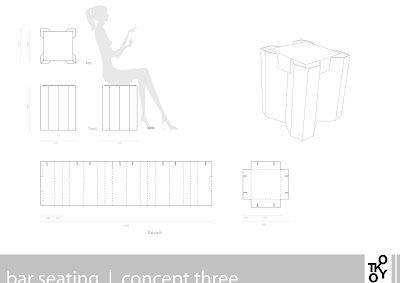 Concept 2:
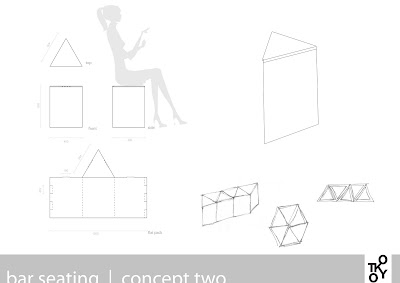
Much like the previous concept, this one also focusing on flexibility of function. This simple form can be arranged either as a single item, wall/bench seating or a large sofa like arrangement.
 concept 1:
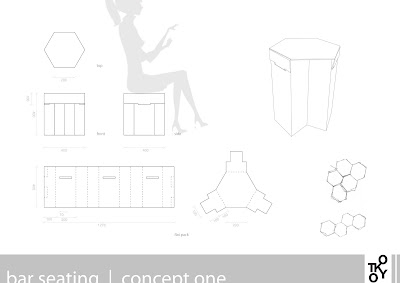
The main focus of this design was to ensure that it had the support of the angled plains and was convient in the way that it could be arranged.
This design differs from the first too as it does not have the ability to lock into itself. It however takes on much more of an aesthetic role with its many folds and successful locking system.
 Concept 2:
Much like the previous concept, this one also focusing on flexibility of function. This simple form can be arranged either as a single item, wall/bench seating or a large sofa like arrangement.
 concept 1:
The main focus of this design was to ensure that it had the support of the angled plains and was convient in the way that it could be arranged.

New brief - Sketches
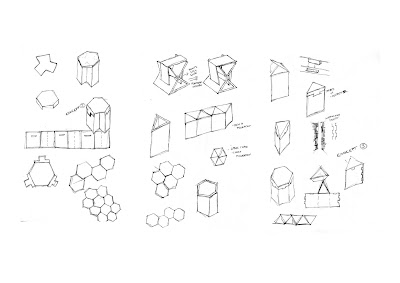
I then continued to sketch similar designs as previously but had more success in developing aesthetics as well as function. I also want to create a design that it easily tranformed into bench, wall or large area seating; therefore being flexible in its use. This wil we done using geometic shapes (such as a triangle or hexagon), that have the ability to sit next to or lock together.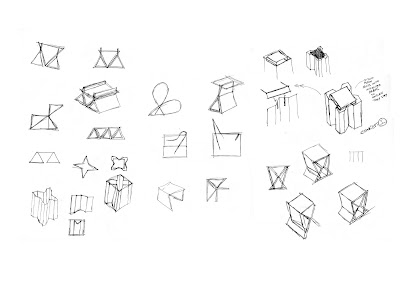


Brief alteration - Bar furniture
New Brief:
After further research on 100% Design Tokyo and observing my previous designs/concepts, I have made a transformation in what i want to achieve through the design of my chair. Due to my current concepts being small and stool-like, the do not succeed in fulfilling my previous brief of seminar seating.
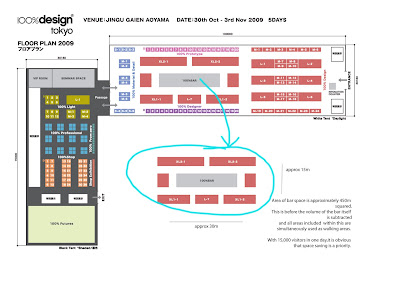
With further research on the existance, location, use and furniture within 100% Bar, I see it as an opportunity to continue the design process I've started already. As you can see from the below image, the bar is situated within the displays and the current furniture is an array of space- consuming tables and chairs. Because people are constantly in an out of the bar between exhibits, it is only logical to have more practically sized furniture.
My design will:
- replace the existing furniture surrounding the bar
- procide a more space concious design through combining the use of table and chair in the one design.
- offer furniture that reflects the concept of a 'quick bite' or drink.
- be easily assembled from a flat pack.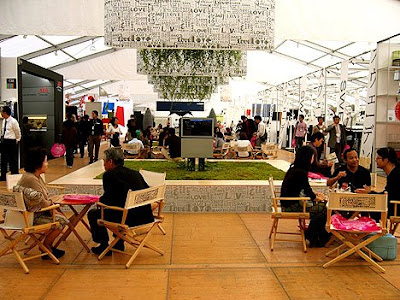 Analysis of the chosen space:
While looking at the locaiton map and the existing furniture within the bar, it is apparent to me that the number of seating could almost be double with the right design.
After further research on 100% Design Tokyo and observing my previous designs/concepts, I have made a transformation in what i want to achieve through the design of my chair. Due to my current concepts being small and stool-like, the do not succeed in fulfilling my previous brief of seminar seating.
With further research on the existance, location, use and furniture within 100% Bar, I see it as an opportunity to continue the design process I've started already. As you can see from the below image, the bar is situated within the displays and the current furniture is an array of space- consuming tables and chairs. Because people are constantly in an out of the bar between exhibits, it is only logical to have more practically sized furniture.
My design will:
- replace the existing furniture surrounding the bar
- procide a more space concious design through combining the use of table and chair in the one design.
- offer furniture that reflects the concept of a 'quick bite' or drink.
- be easily assembled from a flat pack.
 Analysis of the chosen space:
While looking at the locaiton map and the existing furniture within the bar, it is apparent to me that the number of seating could almost be double with the right design.

Tuesday, April 21, 2009
Major Project - Stage 2
Concept four:
This concept was probably the most successful once revisited. Originally the idea was to have just have the top triangular plain tabbed to the bottom would simply slot in. This however allowed the top half to open with the natural force of the cardboard. So adding the addition tabs to the bottom supporting plains allowed this design to work.
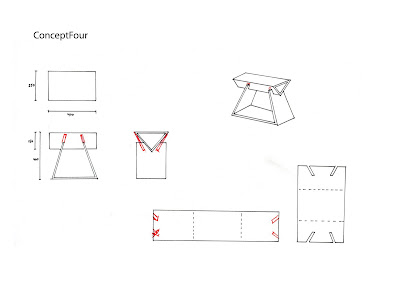
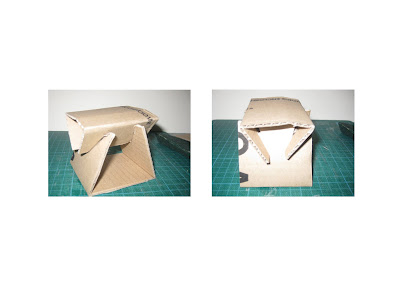
This concept was probably the most successful once revisited. Originally the idea was to have just have the top triangular plain tabbed to the bottom would simply slot in. This however allowed the top half to open with the natural force of the cardboard. So adding the addition tabs to the bottom supporting plains allowed this design to work.


Subscribe to:
Posts (Atom)

